File Manager - Settings
There are a number of options you have to control the searches within the various File Manager Screens.
https://youtu.be/6BNBjySCXdM
With all the management tools we restrict our searches to where we expect to find audio files or Audio Notetaker documents.
By default we search the Audio Notetaker Recording folder, normally in My Documents. You can change this in Settings.
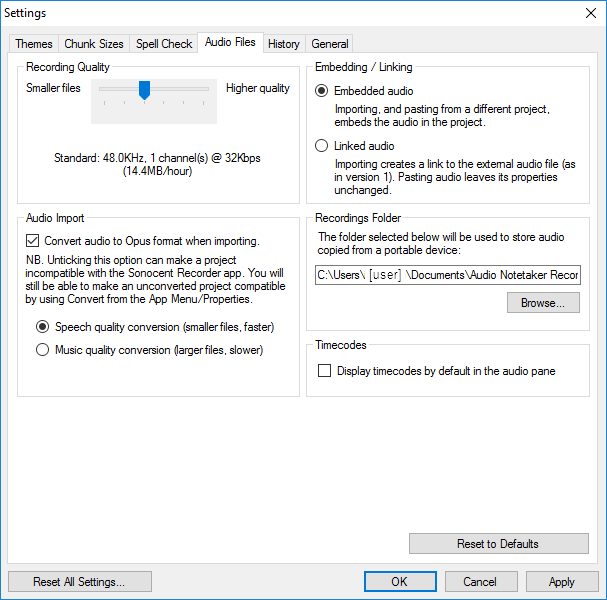
Go to App Menu > System > Settings and open the Audio Files tab.
The central-right box allows you to change where we store files copied from a digital recorder but changing this also changes the default search location for all your files.
To see all locations we search, and to add and remove folders from the search, go to App Menu > Manage > Select Search Folders.
The first box displays all the folders we search. If you want to stop searching a particular folder; just un-tick it. You can re-tick, at a later date, if you want to add it back.
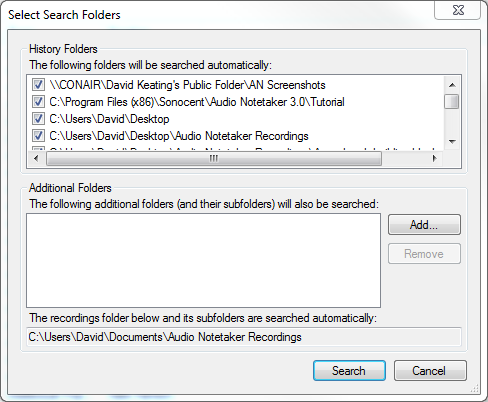
The next box allows you to add a folder to the search. Click Add and browse to the folder you want to add.
If you added the C: drive here then we would search your entire drive for files. We don’t recommend this as it can dramatically affect the speed of the search. However, if you cannot find a particular file on your computer then you may want to add the C drive search and once you have located your file remove the search by selecting the folder and clicking Remove.
Search Projects
When you use the Search Proejcts tool the selection boxes can show your history, allowing you to quickly search for specific files.
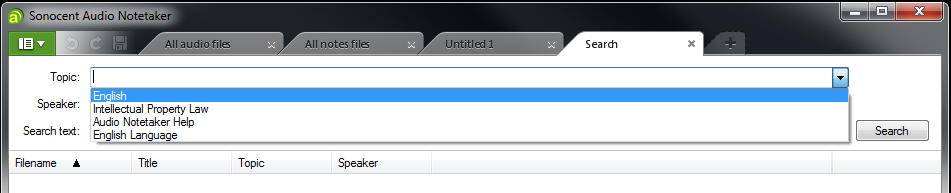
You can change what is displayed here, from the Settings menu. Go to App Menu > System > Settings and open the History tab.
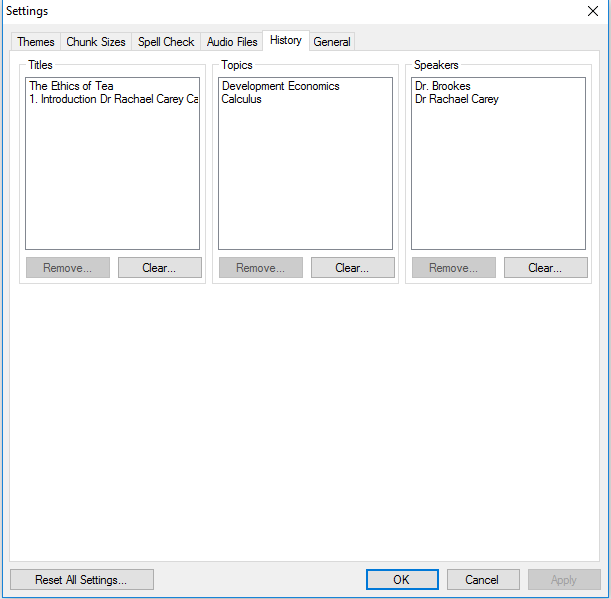
You can clear all entries or remove individual entries. These will then not show in the drop down boxes when you search for files.
Every time you open an Audio Notetaker file we update the History, so opening a file with something that you have deleted from your history will add it back.
Deleting All History Data
You can reset all your History at once, this includes the search folders and your history but also includes other items you may not want to delete!
Such as:
Open the App menu and go to System > Locate User Data
This shows the three files we store user data in. The preferences file contains details of the default colours, fonts, sizes etc that you have set up, as well as details about your colour key templates and other settings.
The Log file is where we store any error messages that may occur in Audio Notetaker. You may be asked to email us this file to help diagnose an issue.
And the History file, is where we store the information about your search history.
If you want to return to a clean history file, as you would expect at the time of first installation then you can delete or rename this file. If you are unsure as to whether you want to lose all the information in the file then just rename it. If at a later time you want to use it again just change the name back to History.xml and re-open Audio Notetaker.
https://youtu.be/6BNBjySCXdM
With all the management tools we restrict our searches to where we expect to find audio files or Audio Notetaker documents.
By default we search the Audio Notetaker Recording folder, normally in My Documents. You can change this in Settings.
Go to App Menu > System > Settings and open the Audio Files tab.
The central-right box allows you to change where we store files copied from a digital recorder but changing this also changes the default search location for all your files.
To see all locations we search, and to add and remove folders from the search, go to App Menu > Manage > Select Search Folders.
The first box displays all the folders we search. If you want to stop searching a particular folder; just un-tick it. You can re-tick, at a later date, if you want to add it back.
The next box allows you to add a folder to the search. Click Add and browse to the folder you want to add.
If you added the C: drive here then we would search your entire drive for files. We don’t recommend this as it can dramatically affect the speed of the search. However, if you cannot find a particular file on your computer then you may want to add the C drive search and once you have located your file remove the search by selecting the folder and clicking Remove.
Search Projects
When you use the Search Proejcts tool the selection boxes can show your history, allowing you to quickly search for specific files.
You can change what is displayed here, from the Settings menu. Go to App Menu > System > Settings and open the History tab.
You can clear all entries or remove individual entries. These will then not show in the drop down boxes when you search for files.
Every time you open an Audio Notetaker file we update the History, so opening a file with something that you have deleted from your history will add it back.
Deleting All History Data
You can reset all your History at once, this includes the search folders and your history but also includes other items you may not want to delete!
Such as:
- Key words used in your text searches
- Last folders used to save and open files
- Whether to show welcome video or open Tutorial file when Audio Notetaker starts
- Window size and positions
- Your recent documents list
Open the App menu and go to System > Locate User Data
This shows the three files we store user data in. The preferences file contains details of the default colours, fonts, sizes etc that you have set up, as well as details about your colour key templates and other settings.
The Log file is where we store any error messages that may occur in Audio Notetaker. You may be asked to email us this file to help diagnose an issue.
And the History file, is where we store the information about your search history.
If you want to return to a clean history file, as you would expect at the time of first installation then you can delete or rename this file. If you are unsure as to whether you want to lose all the information in the file then just rename it. If at a later time you want to use it again just change the name back to History.xml and re-open Audio Notetaker.
Related Articles
How do I Use the File Manager?
In Audio Notetaker we have an extensive file manager to help you keep track of your Audio Notetaker projects, audio files and manage the recordings on a digital recorder or your Sonocent Recorder App. All the manager tabs can be opened from the App ...Portable Device Manager
The Portable Device Manager will normally open when you plug in your device or it can be opened from the APP Menu > Manage > View Portable Devices If you want to transfer your files from the Sonocent recorder App then you will need to open the ...Reference Guide: 1.3 File Manager Tabs
There are four Audio Notetaker File Manager tabs: All Projects - See all your Audio Notetaker project files at one time and sort them by date or tags. All Audio Files - Easily locate & play audio recordings and import them into Audio Notetaker. ...Android User Guide - Settings
To configure the App press the settings button (1). General Upgrade Sonocent Recorder - Upgrade from the free version of the app to add additional features. Recording Quality - You can choose from 4 different quality settings: Extra LP: 48.0KHz, 1 ...IOS User Guide - Settings
To configure the App press the settings button (1). General Upgrade Sonocent Recorder - Upgrade from the free version of the app to add additional features. Recording Quality - You can choose from 4 different quality settings: Extra LP: 48.0KHz, 1 ...